6.5 KiB
A more basic getting started
Writing mermaid code is simple.
But how is the code turned into a diagram in a web page? To do this we need a mermaid renderer.
Thankfully the mermaid renderer is very accessible, in essence it is a javascript.
The requirement is on the part of the web browser. Modern web browsers, such as Firefox, Chrome and Safari, can render mermaid. But Internet Explorer cannot. The web browser also needs access to the online mermaid renderer which it downloads from https://cdn.jsdelivr.net/npm/mermaid
For an easy introduction, here follows three practical examples using:
- an online mermaid editor
- a mermaid plugin
- a generic web server of your choosing
Following either of these examples, you can get started with converting your own mermaid code into web diagrams.
the mermaid live editor
The quickest way to get started with mermaid is to visit The mermaid live editor.
In the Code section one can write or edit raw mermaid code, and instantly Preview the rendered result.
This is a great way to get started.
It is also the easiest way to develop diagrams, the code of which can be pasted straight into documentation.
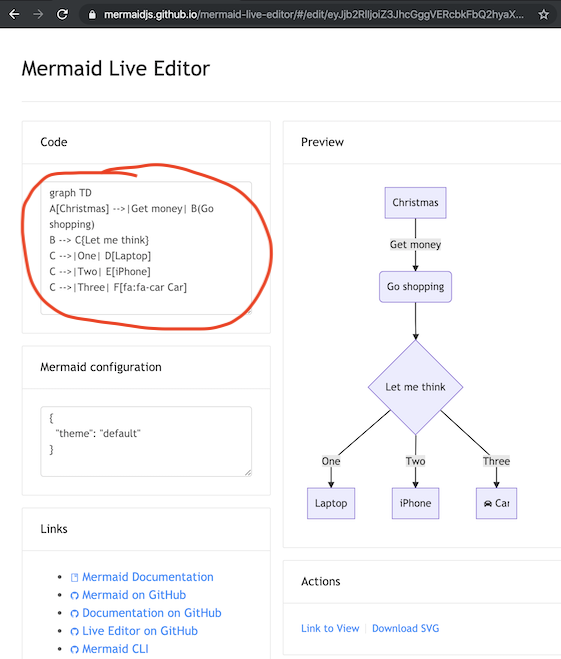
The Mermaid configuration is for controlling mermaid behaviour. An easy introduction to mermaid configuration is found in the Advanced usage section. A complete configuration reference cataloguing default values is found on the mermaidAPI page.
mermaid using plugins
Thanks to the growing popularity of mermaid, many plugins already exist which incorporate a mermaid renderer.
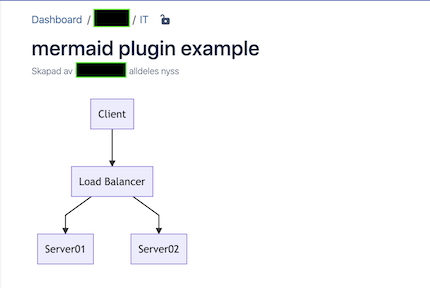
One example is the Atlassian Confluence mermaid plugin
When the mermaid plugin is installed on a Confluence server, one can insert a mermaid object into any Confluence page.
- In a Confluence page, Add Other macros.
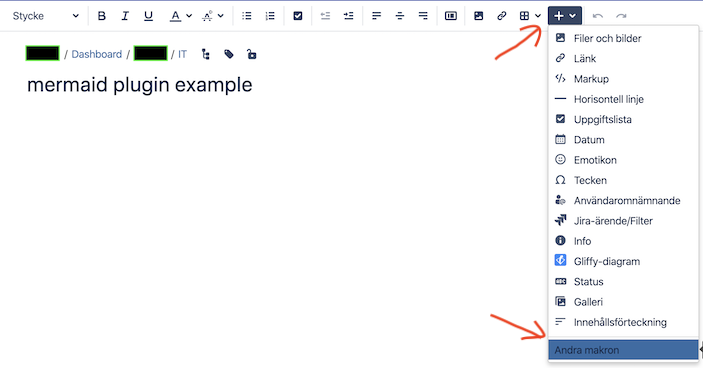
- Search for mermaid.
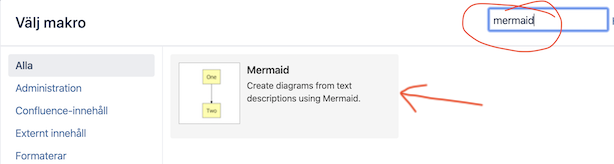
- The mermaid object appears. Paste your mermaid code into it.
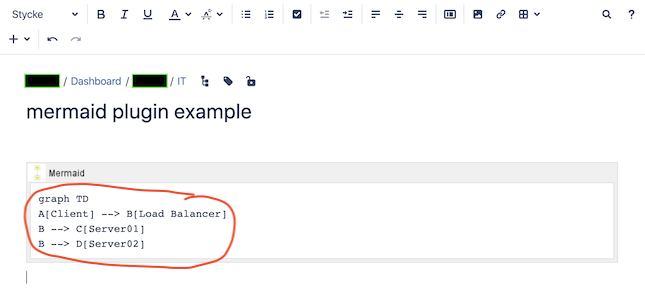
- Save the page and the diagram appears.
mermaid using any web server (or just a browser)
This example can be used with any common web server. Apache, IIS, nginx, node express [...], you pick your favourite.
We do not need to install anything on the server, apart from a normal file of html to be reached by a web browser (such as Firefox, Chrome, Safari, but not Internet Explorer). So if you want to really simplify things when testing this out, don't use a web server at all but just create the file locally and drag it into your browser window. It is the browser which does all the work of rendering mermaid!
Through the html file, we give the web browser three instructions inside the html code it retrieves:
- a reference for fetching the online mermaid renderer, the renderer is just a javascript.
- the mermaid code we want to diagram.
- the
mermaid.initialize()command to start the rendering process
All this is done in the html <body> section of the web page.
This is what needs to go into the html file:
- The reference to the mermaid renderer is done in a
<script src>tag like so:
<body>
  <script src="https://cdn.jsdelivr.net/npm/mermaid@8.4.0/dist/mermaid.min.js"></script>
</body>
- The embedded mermaid code is similarly placed in a
<div>tag:
<body>
  Here is a mermaid diagram:
  <div class="mermaid">
    graph TD
    A[Client] --> B[Load Balancer]
    B --> C[Server01]
    B --> D[Server02]
  </div>
</body>
- When initializing mermaid using
mermaid.initialize(), mermaid takes all the<div class="mermaid">tags it can find in the html body and starts to render them one by one. This is done like so:
<body>
  <script>mermaid.initialize({startOnLoad:true});</script>
</body>
Finally 4. Putting the three steps together is as simple as:
<html>
  <body>
    <script src="https://cdn.jsdelivr.net/npm/mermaid@8.4.0/dist/mermaid.min.js"></script>
    <script>mermaid.initialize({startOnLoad:true});</script>

    Here is one mermaid diagram:
    <div class="mermaid">
      graph TD
      A[Client] --> B[Load Balancer]
      B --> C[Server1]
      B --> D[Server2]
    </div>

    And here is another:
    <div class="mermaid">
      graph TD
      A[Client] -->|tcp_123| B(Load Balancer)
      B -->|tcp_456| C[Server1]
      B -->|tcp_456| D[Server2]
    </div>
  </body>
</html>
Save this to a html file and fetch it with a browser from the web server (or just drag it into your web browser window) and voila!
Three additional comments from Knut Sveidqvist, creator of mermaid:
-
In early versions of mermaid, the
<script src>tag was invoked in the<head>part of the web page. Nowdays we can place it directly in<body>as seen above. However, older parts of the documentation frequently reflects the previous way which still works. -
We initialize the mermaid rendering with
mermaid.initialize()directly in the html code. In principle this could be done through placingmermaid.initialize()inside ofmermaid.min.js. We would then eliminate the need for this explicit line in the html. However, there are use cases where we do want to separate the two steps. Sometimes we want full control over when we start looking for<div>tags inside the web page withmermaid.initialize(), for example when we think that all<div>tags may not have been loaded by the timemermaid.min.jsruns. -
In the example above,
mermaid.min.jsis called using an absolute path. Even worse, the example includes the mermaid version number which of course will change as time goes by. However, the example makes it easy to understand what is going on - even though it is perhaps doomed in a way we do not want in a production environment. When going from testing mermaid out to getting serious with it, I would suggest one of the following approaches for callingmermaid.min.js:- If you do not enter a specific version, you automatically get the latest one.
- If you really need a specific version, hard code it (this is rare but it happens).
- If you need to know the current mermaid version, replace a mermaid code block with the word
infoand the version will be returned like this